Mastering the Smart Money Strategy
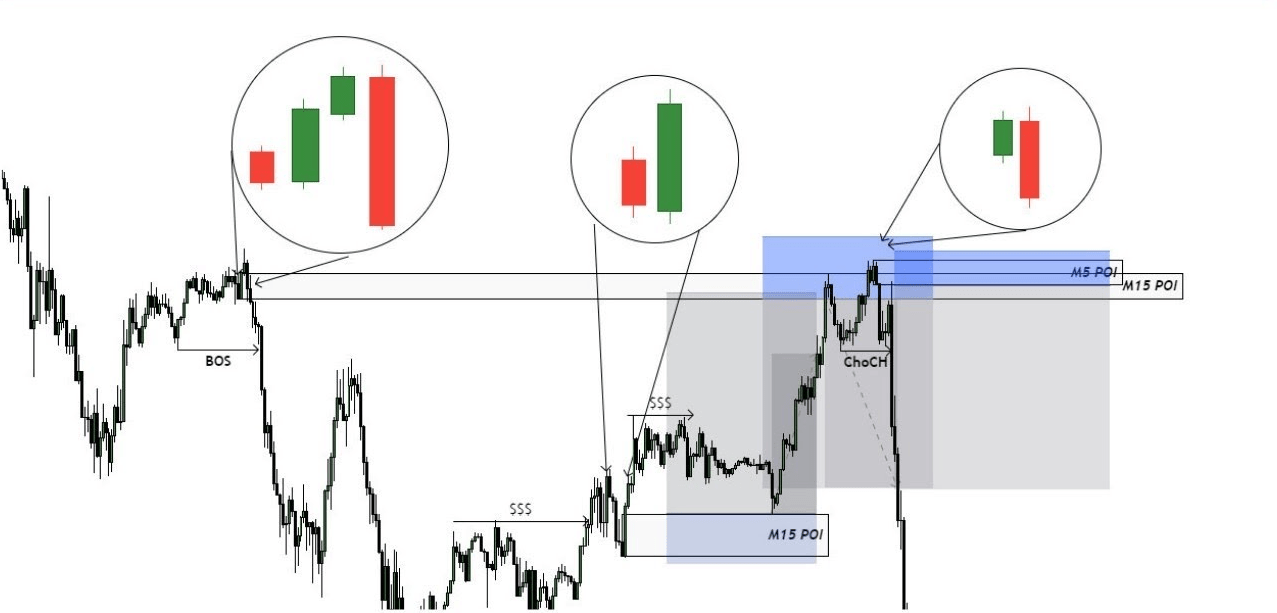
If you have been trading for a while, you’ve likely noticed that the market doesn’t move randomly. Behind the scenes, large financial institutions and banks—often referred to as "Smart Money"—drive the price action. Retail traders often find themselves trapped, hitting stop losses right before the market moves in their predicted direction.
Enter this highly structured approach based on Smart Money Concepts (SMC). This strategy is designed to help you stop trading against the institutions and start trading with them.
Let’s break down the strategy step-by-step so you can start analyzing the charts like a professional.
The Core Philosophy
This strategy strips away the noise and focuses on pure price action and institutional footprints. At its heart, the system relies on a simple but incredibly powerful formula:
Market Bias + Liquidity Sweep + Structure Break + Order Block Entry = High Probability Trade
By waiting for all these conditions to align, you dramatically increase your win rate and secure excellent Risk-to-Reward (RR) ratios.
The 7-Step Trading Process
Step 1: Identify the Market Bias
Before placing a trade, you need to know who is in control. This is defined by basic market structure. We use schematic diagrams to simplify this view.
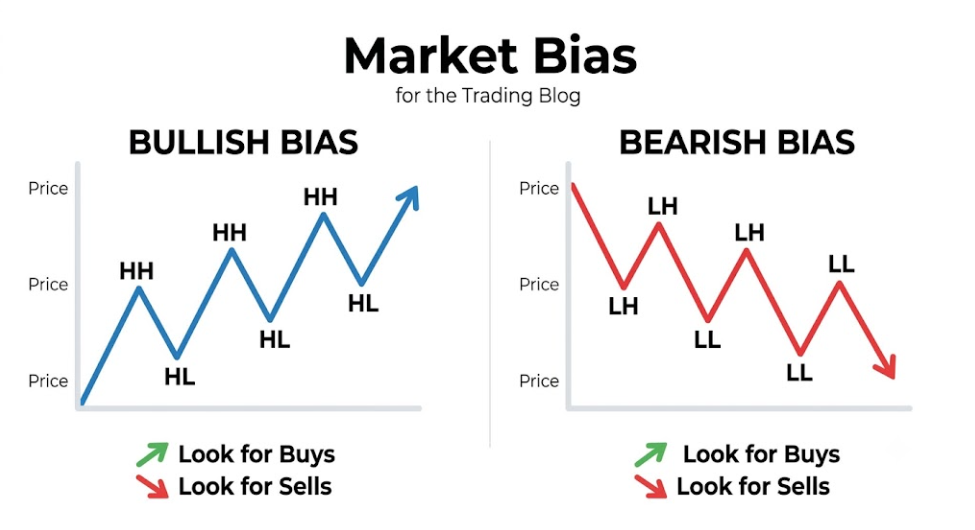
Figure 1: Defining Market Bias
As visualized in Figure 1, identifying the bias is straightforward:
-
Bullish Bias: The market is printing a sequence of Higher Highs (HH) and Higher Lows (HL). Look for buying opportunities.
-
Bearish Bias: The market is printing a sequence of Lower Highs (LH) and Lower Lows (LL). Look for selling opportunities.
Step 2: Wait for the Liquidity Sweep
This is where retail traders usually get trapped. "Liquidity" refers to areas where many retail stop-losses are resting—typically above previous highs (equal highs) or below previous lows (equal lows). Smart money will often briefly push the price past these levels to trigger those stops and collect liquidity before reversing the market. Do not enter here; just observe.
Step 3: Look for a Break of Structure (BOS)
Once the liquidity is swept, you need confirmation that the market is actually reversing in your favored direction. Wait for a strong, aggressive push that breaks the recent market structure (BOS). This move confirms that smart money has stepped in and intends to move the price.
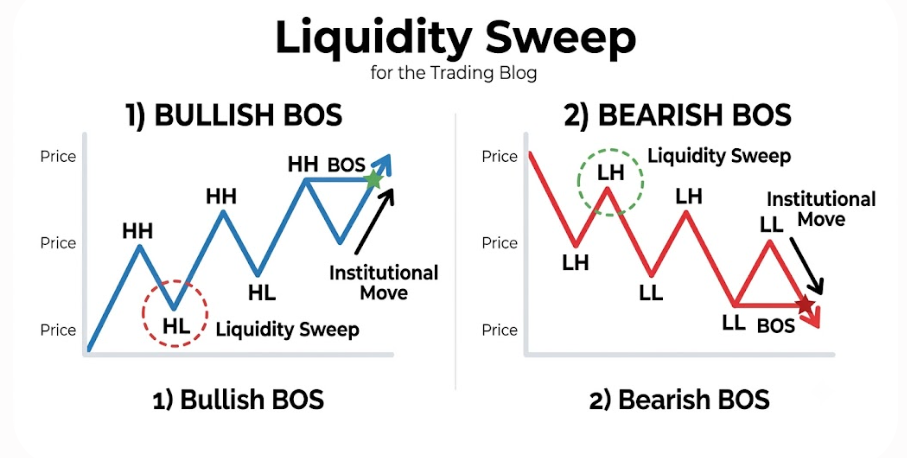
Figure 2: The Catalyst — Liquidity Sweep and Break of Structure (BOS)
Figure 2 visualizes how a trend is 'confirmed' by the institutional footprint. Notice how, in both Bullish and Bearish scenarios, the Liquidity Sweep is followed immediately by an aggressive Break of Structure (BOS). This sequence tells you: "The trap is set, and the institutions are now moving."
Step 4: Identify the Order Block / POI
Look back at the origin of the strong move that caused the Break of Structure in Figure 2. The last opposing candle before that strong push is your Order Block or Point of Interest (POI). This is the institutional footprint—the exact zone where big players placed their heavy orders.
Step 5: The Entry
Patience is key. Do not chase the breakout. Instead, let the price naturally retrace back to your identified Order Block / POI zone. When the price taps into this zone, execute your trade. This is your high-probability entry point.
Step 6: Place Your Stop Loss
Your stop loss must be logical and protective.
-
For a Buy Trade: Place the stop loss just below the Order Block box.
-
For a Sell Trade: Place the stop loss just above the Order Block box.
Step 7: Set Your Target
Aim for the next major liquidity zone (the structure high or low) or previous significant high/low. This approach is built on profitability, so you should strictly aim for a minimum Risk-to-Reward ratio of 1:2 or 1:3. If the setup doesn't offer this, skip the trade.
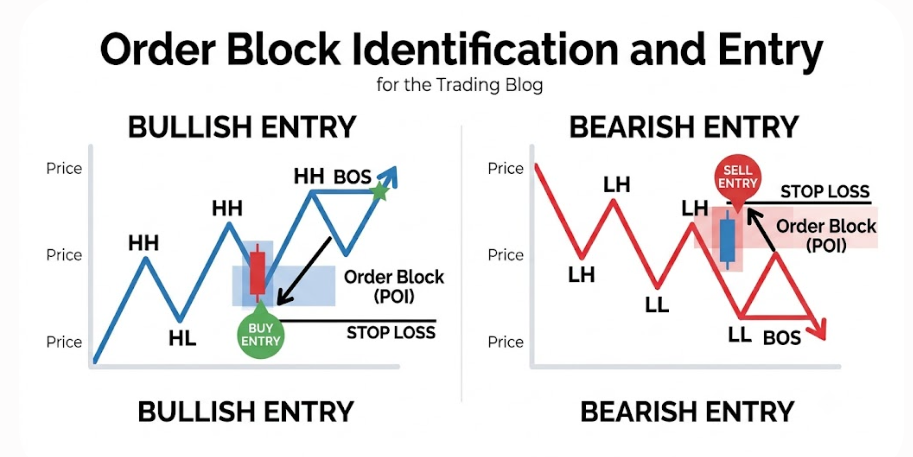
Figure 3: Completing the Setup — Order Block Identification and Entry
Figure 3 illustrates the completion of the trade setup defined by the previous figures. It shows exactly how we zoom in after the BOS occurs (from Figure 2). The strategy relies on defining the high-probability zone (the Order Block, shown as blue or red transparent boxes) and waiting for the price to return for the precise Entry. This image highlights where your entry and logical stop loss must be placed to ensure the required risk management (1:2 or 1:3 RR).
Non-Negotiable Risk Management Rules
Even the best trading system in the world will fail without strict risk management. To survive and thrive using this strategy, follow these rules:
-
Protect Your Capital: Never risk more than 1% to 2% of your total account balance on a single trade.
-
Wait for Confirmation: Never jump into a trade out of FOMO (Fear of Missing Out). Wait for the structure defined in Figure 2 (Sweep and BOS).
-
Avoid Overtrading: Quality over quantity. One perfect setup a week is better than five mediocre trades a day.
-
Respect the Math: Always stick to the 1:2 or 1:3 Risk-to-Reward rule shown in Figure 3. Let your winners run and cut your losses precisely at your stop loss.
Note:
Trading is a marathon, not a sprint. Consistency doesn't happen overnight; it comes from repetitive, disciplined practice.
Before you commit real money, spend time studying the charts. Backtest this strategy to train your eyes to spot Market Bias (Figure 1), Liquidity Sweeps and BOS (Figure 2), and Order Blocks (Figure 3). Start with a demo account or use very small risk capital. Once you have proven to yourself that you can execute the steps flawlessly, then—and only then—should you scale up.
Trade smart, follow the footprints of the institutions, and stay disciplined.